
In the previous example we’ve tested with ApacheBench an application deployed using Kubernetes and Docker, composed by a Node.js microservice to get and set key value pairs on Redis.
We saw that if we have many concurrent requests from multiple clients we can’t know before which will be the final value of the key on Redis.
In this post we see an example about how we can lock a key value pair on Redis, so that another client has to wait before to set a new value.
We will use the Node.js implementation of Redlock, the algorithm to have distributed locks with Redis.
To try this example on your PC you only need to install Docker Desktop and Node.js then follow the described steps.
Create a directory for this example and inside copy the two directories from the previous example, redis-server and webservice.
mkdir node-redis-example-5
cd node-redis-example-5
cp -r ../node-redis-example-4/redis-server/ .
cp -r ../node-redis-example-4/webservice/ .
Enter the redis-server directory and build our redis-server Docker image.
If you didn’t tried the previous example, read it to know about the Redis persistence directory and how to configure it on your PC.
cd redis-server
docker build -t redis-server:1.0.0 -f Dockerfile .
Rename the application to “node-redis-example-5” inside the deloy.yml file and apply the redis-server Kubernetes deployment configuration.
kubectl apply -f ./deploy.yml
Rename the application to “node-redis-example-5” inside the service.yml file and apply the redis-server Kubernetes service configuration.
kubectl apply -f ./service.yml
Go inside the webservice directory and install the redlock package and the log-timestamp package.
cd ../webservice
npm i redlock log-timestamp
Edit the index.js file to import these packages and add a new endpoint, called “lockAndSetValue”.
It will use redlock to lock a key on Redis and when the lock is acquired it will set the value.
Then it will wait for 10 seconds, as if we are waiting an asyncornous job to complete.
Thanks to the retryCount options set to -1, before the 10 seconds ends, the others clients will continue to try to acquire the lock on the key until the lock is released by the first client.
After 10 seconds the lock is released so one another client can now do the same.
// Import packages.
const express = require('express')
const redis = require('redis')
const Redlock = require('redlock')
const { promisify } = require('util')
require('log-timestamp');

// Create and configure a webserver.
const app = express()
app.use(express.json())

// Create and configure a Redis client.
const redisClient = redis.createClient('6379', process.env.REDIS_SERVER_IP)
redisClient.on('error', error =>  console.error(error))
const redisSet = promisify(redisClient.set).bind(redisClient)
const redisGet = promisify(redisClient.get).bind(redisClient)

const redlock = new Redlock(
	[redisClient],
	{
		driftFactor: 0.01,
		retryCount:  -1,
		retryDelay:  200,
		retryJitter:  200
	}
)

redlock.on('clientError', function(err) {
	console.error('A redis error has occurred:', err);
});

// Adding a simple function to wait some time.
const sleep = (ms) =>  new Promise(resolve => setTimeout(resolve, ms))

// Create and endpoint to lock a key value paire and set the value.
app.post('/lockAndSetValue', async (req, res) => {
    console.log('Request received!')
    if (req.body.key && req.body.value) {
        try {
            const resource = `locks:${req.body.key}`
            const ttl = 20000
            redlock.lock(resource, ttl)
                .then(async function(lock) {
                    console.log('Lock acquired!')
                    await redisSet(req.body.key, req.body.value)
                    console.log(`SET key=${req.body.key} value=${req.body.value}`)
                    console.log('Waiting some time...')
                    await sleep(10000)
                    console.log('Time finished, key unlocked!')
                    return lock.unlock()
                .catch(function(err) {
                    console.error(err);
                })
            })
            console.log('Sending response!')
            res.send()
        } catch (e) {
            res.json(e)
        }
    } else {
        res.status(400).json({ error: 'Wrong input.' })
    }
})

// Create an endpoint to set a key value pair.
app.post('/setValue', async (req, res) => {
    if (req.body.key && req.body.value) {
        try {
            await redisSet(req.body.key, req.body.value)
            console.log(`SET key=${req.body.key} value=${req.body.value}`)
            res.send()
        } catch (e) {
            res.json(e)
        }
    } else {
        res.status(400).json({ error: 'Wrong input.' })
    }
})

// Create an endpoint to get a key value pair.
app.get('/getValue/:key', async (req, res) => {
    if (!req.params.key) {
        return res.status(400).json({ error: 'Wrong input.' })
    }

    try {
        const value = await redisGet(req.params.key)
        console.log(`GET key=${req.params.key} value=${value}`)
        res.json(value)
    } catch (e) {
        res.json(e)
    }
})

// Start the webserver.
app.listen(3000, () => {
    console.log('Server is up on port 3000')
})
We can now build the new image of our webservice.
docker build -t webservice:1.0.0 -f Dockerfile .
To have two identical clients on two differents ports, from the deploy.yml and service.yml files inside the webservice directory, we create two couple of files to have two differents deployments and services, always using the same webservice image.
deploy-1.yml
apiVersion: apps/v1
kind: Deployment
metadata:
  labels:
    application: node-redis-example-5
    component: webservice-1
  name: webservice-1
spec:
  replicas: 1
  selector:
    matchLabels:
      application: node-redis-example-5
      component: webservice-1
  strategy:
    rollingUpdate:
      maxSurge: 2
      maxUnavailable: 0
    type: RollingUpdate
  template:
    metadata:
      labels:
        application: node-redis-example-5
        component: webservice-1
        redeploy: '1'
    spec:
      containers:
        - name: webservice-1
          image: webservice:1.0.0
          env:
          - name: REDIS_SERVER_IP
            value: "redis-server"
          ports:
          - name: webservice-1
            containerPort: 3000
            protocol: TCP
deploy-2.yml
apiVersion: apps/v1
kind: Deployment
metadata:
  labels:
    application: node-redis-example-5
    component: webservice-2
  name: webservice-2
spec:
  replicas: 1
  selector:
    matchLabels:
      application: node-redis-example-5
      component: webservice-2
  strategy:
    rollingUpdate:
      maxSurge: 2
      maxUnavailable: 0
    type: RollingUpdate
  template:
    metadata:
      labels:
        application: node-redis-example-5
        component: webservice-2
        redeploy: '1'
    spec:
      containers:
        - name: webservice-2
          image: webservice:1.0.0
          env:
          - name: REDIS_SERVER_IP
            value: "redis-server"
          ports:
          - name: webservice-2
            containerPort: 3000
            protocol: TCP
service-1.yml
apiVersion: v1
kind: Service
metadata:
  name: webservice-1
  labels:
    application: node-redis-example-5
    component: webservice-1
spec:
  type: NodePort
  selector:
    application: node-redis-example-5
    component: webservice-1
  ports:
  - protocol: TCP
    port: 3000
    targetPort: 3000
    nodePort: 30001
service-2.yml
apiVersion: v1
kind: Service
metadata:
  name: webservice-2
  labels:
    application: node-redis-example-5
    component: webservice-2
spec:
  type: NodePort
  selector:
    application: node-redis-example-5
    component: webservice-2
  ports:
  - protocol: TCP
    port: 3000
    targetPort: 3000
    nodePort: 30002
Apply these configurations using kubectl.
kubectl apply -f ./deploy-1.yml
kubectl apply -f ./deploy-2.yml
kubectl apply -f ./service-1.yml
kubectl apply -f ./service-2.yml
Now we have the first microservice listening to the port 30001 and the second on port 30002.
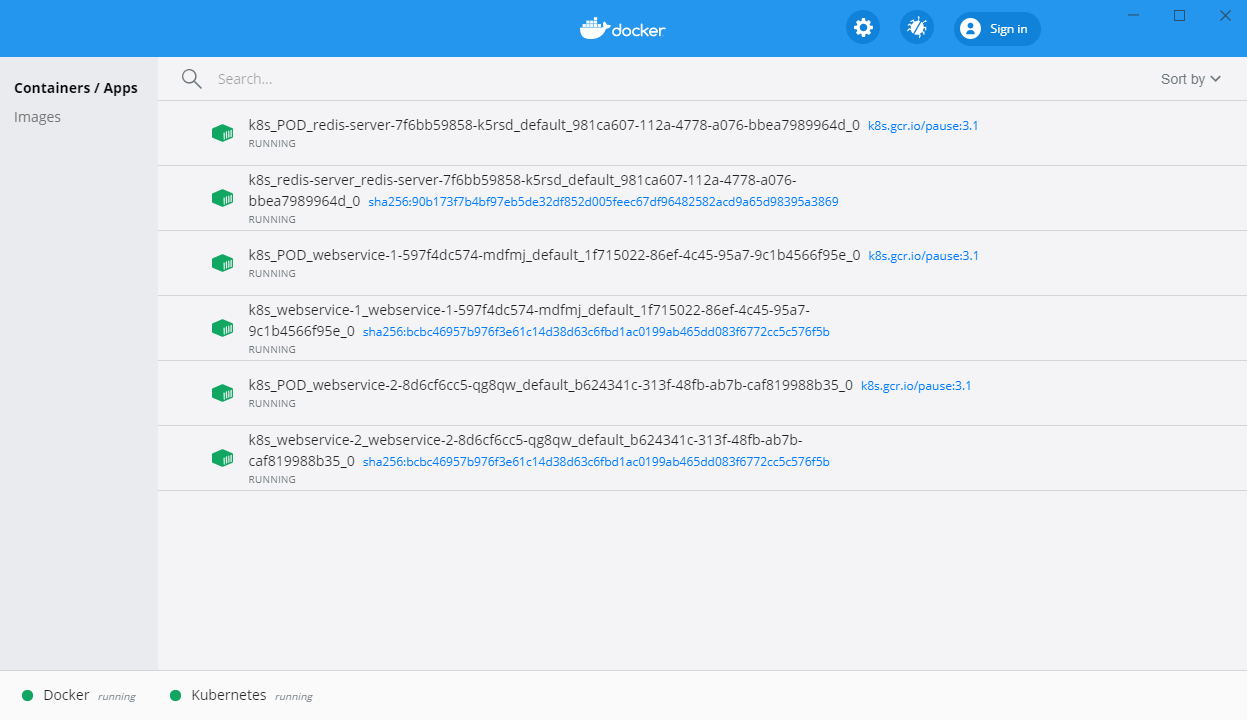
As in the previous example, we list the container’s running.
docker ps -a
Look for the two microservice’s container ids, for example:
CONTAINER ID        IMAGE               COMMAND                  CREATED             STATUS              PORTS               NAMES
3346b3569723        bcbc46957b97        "docker-entrypoint.s…"   9 seconds ago       Up 8 seconds                            k8s_webservice-2_webservice-2-8d6cf6cc5-qg8qw_default_b624341c-313f-48fb-ab7b-caf819988b35_0
be8cb77ea5d0        bcbc46957b97        "docker-entrypoint.s…"   12 seconds ago      Up 11 seconds                           k8s_webservice-1_webservice-1-597f4dc574-mdfmj_default_1f715022-86ef-4c45-95a7-9c1b4566f95e_0
125eab4775e6        90b173f7b4bf        "sh -c /run.sh"          3 minutes ago       Up 3 minutes                            k8s_redis-server_redis-server-7f6bb59858-k5rsd_default_981ca607-112a-4778-a076-bbea7989964d_0
Open a second shell window to watch logs of the webservice-1 container.
docker logs -f be8cb77ea5d0
Open a third shell window to watch logs of the second container.
docker logs -f 3346b3569723
Use Postman to call the “lockAndSetValue” on webservice-1, port 30001.
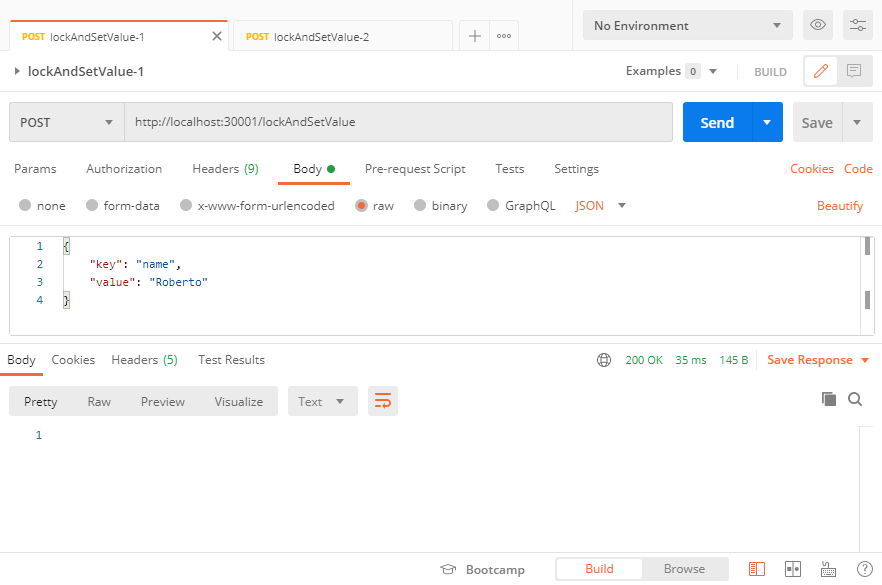
And then, before 10 seconds pass, do the same with webservice-2, port 30002.
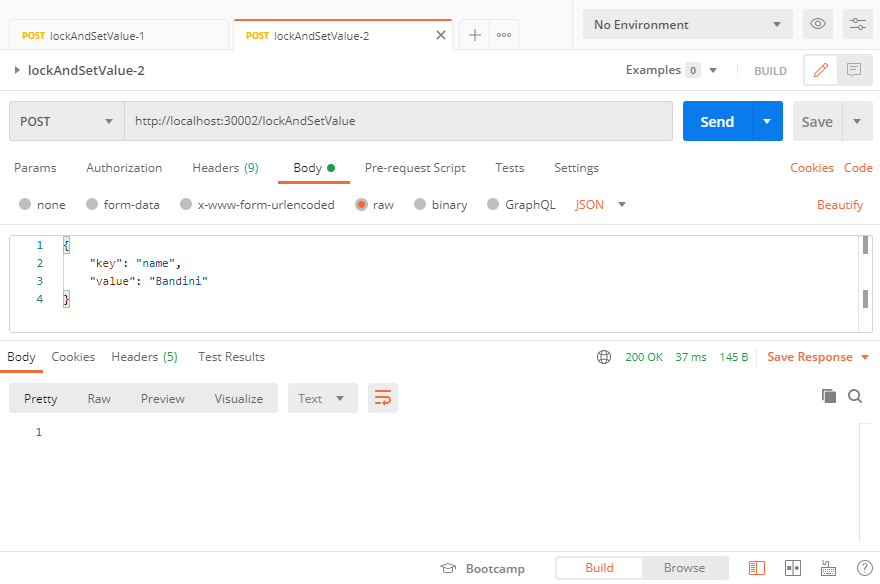
You will able to check the entire sequence through the two containers logs.
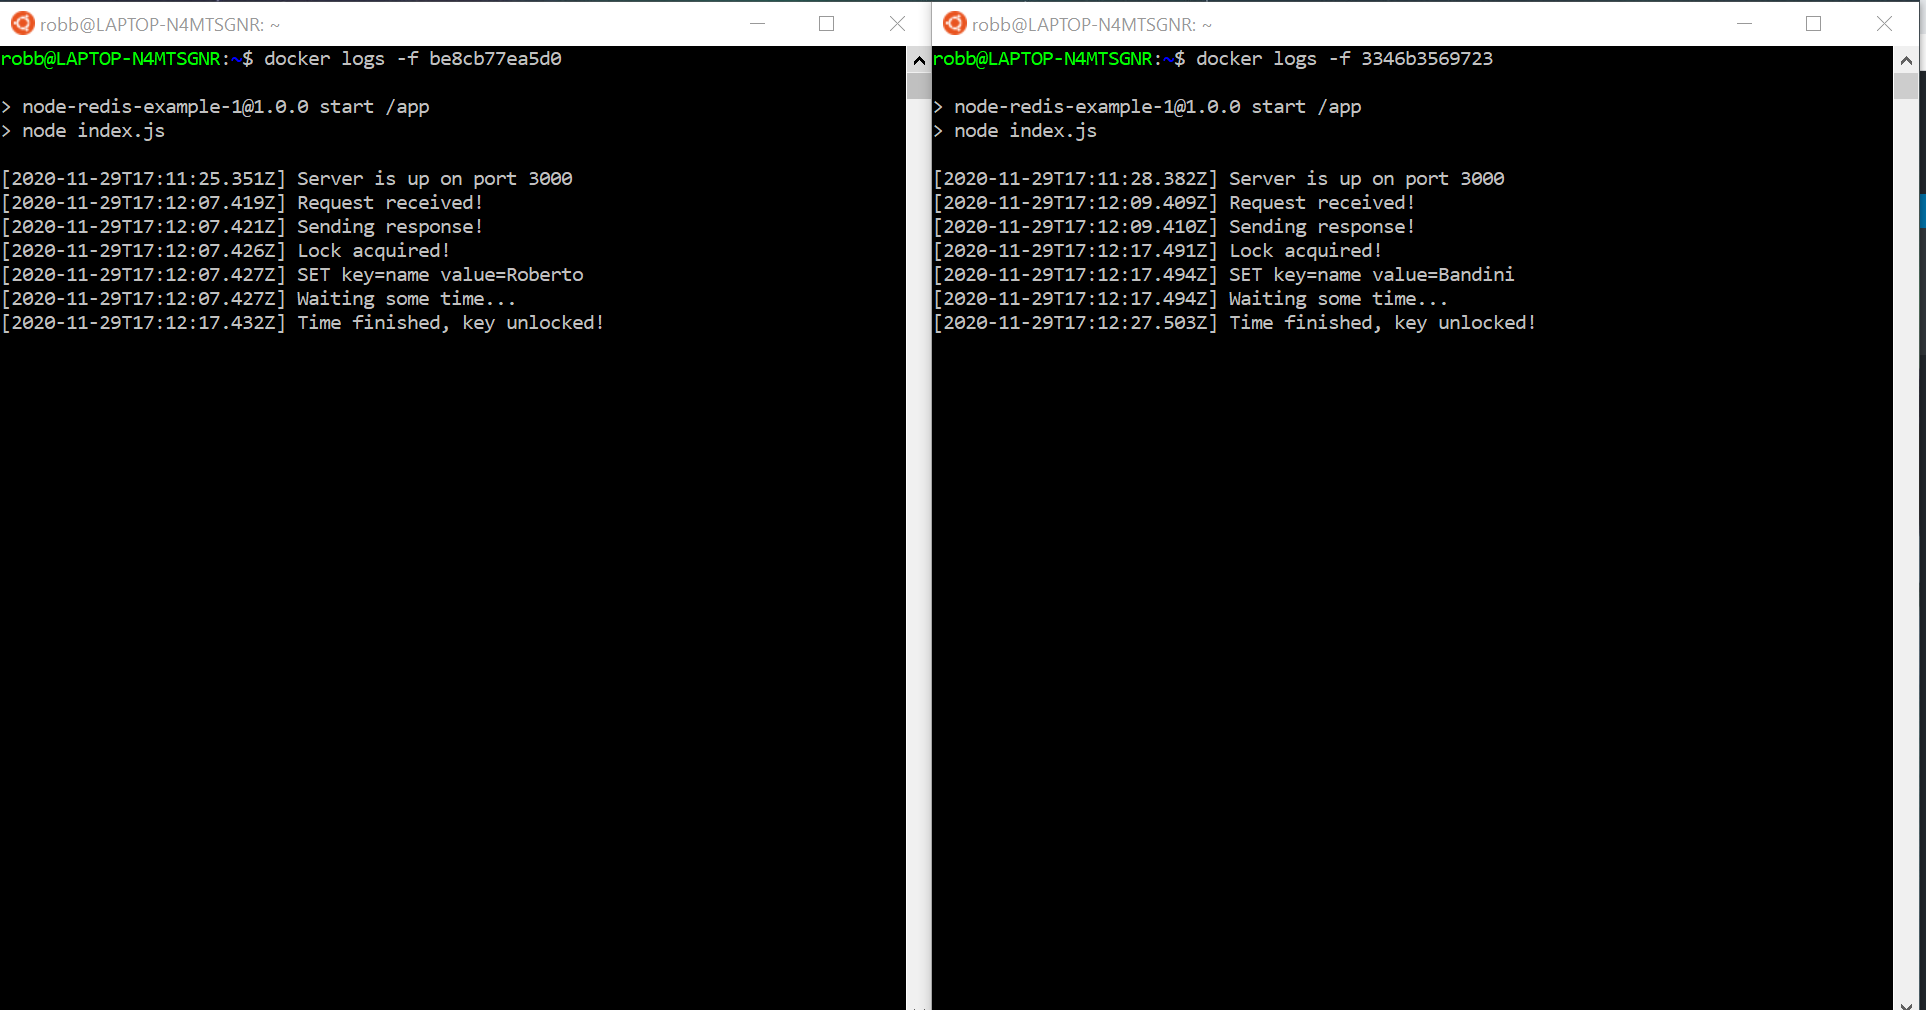
As you can see, the second client will wait until the first client will release the lock after the 10 seconds.
You can find the source code on this GitHub repository:
https://github.com/robertobandini/node-redis-example-5
It also includes the Postman collection used and a sw-version.txt file to specify the softwares used for this project and their versions.